

When you begin terrazzo repair, you want the patch to match. It should look like it was always part of your floor. Many people worry about matching the color and finish. They do not want repairs to stand out from the rest of the terrazzo flooring. Before fixing terrazzo floor spots, you need to know the original materials and colors. Careful planning and paying attention to details help patches blend in. This makes the floor look smooth and even. If you follow a step by step guide for terrazzo repair, you have a better chance of doing it right.
Key Takeaways
- Look at the terrazzo floor closely before you start fixing it. Find all the cracks, chips, and broken spots so you can plan well.
- Clean the floor very well by taking away dirt and old sealant. A clean floor helps the patch stick better.
- Make sure the repair stuff matches the old floor. Check the colors, textures, and sizes so the patch looks the same.
- Mix the patch with a two-part resin system. This makes the patch strong and helps it last longer.
- Put on primer before you add the patch material. Primer helps the patch stick and stops it from peeling or cracking.
- Fill deep holes in layers and let each layer dry before adding more. This stops cracks and makes the repair strong.
- Grind and polish the patched spot to make it smooth. Use the right grit levels for the best look.
- Seal the fixed area to keep it safe from stains and damage. Take care of your terrazzo floor to keep it looking nice.
Assess and Prepare Surface
Before you start repairing terrazzo, you need to check the floor carefully. This step helps you find all the problems and plan your repair. If you skip this, your patch may not last or look right.
Inspect Damage
Identify cracks and chips
Look closely at the floor. Search for cracks, chips, or holes. Damaged terrazzo floors often have small chips near the edges or cracks that run across the surface. Use a flashlight to spot hidden damage. Mark each spot so you do not miss any during the repair. You want to know exactly where the damaged areas are before you begin.
Remove debris and old sealant
After you find the damage, clear away any loose pieces. Old sealant, dust, and dirt can stop new materials from sticking. Use a vacuum or a soft brush to remove debris. If you see old sealant, scrape it off gently. You want a clean surface for the next steps.
Tip: Always wear gloves and a mask when cleaning up dust or old sealant. This keeps you safe and helps you work better.
Clean and Level
Ensure a smooth base
A clean and level surface is key for a strong repair. Any dirt, grease, or leftover residue can make the patch weak. Thorough cleaning of the surface is essential because any contaminants like dust, grease, or residues can significantly hinder the adhesion of sealers and patch materials, which ultimately affects their performance and longevity. Use a damp cloth to wipe the area after removing debris. Let it dry fully before moving on.
If the floor is uneven, use a small grinder or sandpaper to smooth it out. You want the patch to sit flat and blend with the rest of the floor. For best results, gather the right tools before you start. Here are some tools that help prepare terrazzo surfaces:
- Epoxy filler for cracks and chips
- Diamond abrasives for grinding and polishing
- Polishing pads for the final polish
- Sealer to protect the repaired area
When you prepare the surface well, you set yourself up for a repair that lasts. Good preparation also helps the patch blend in, so your floor looks as good as new.
Note: If you hire a contractor, make sure they explain their repair plan. Strong communication and clear, written expectations help you trust the process and avoid surprises.
Match Materials
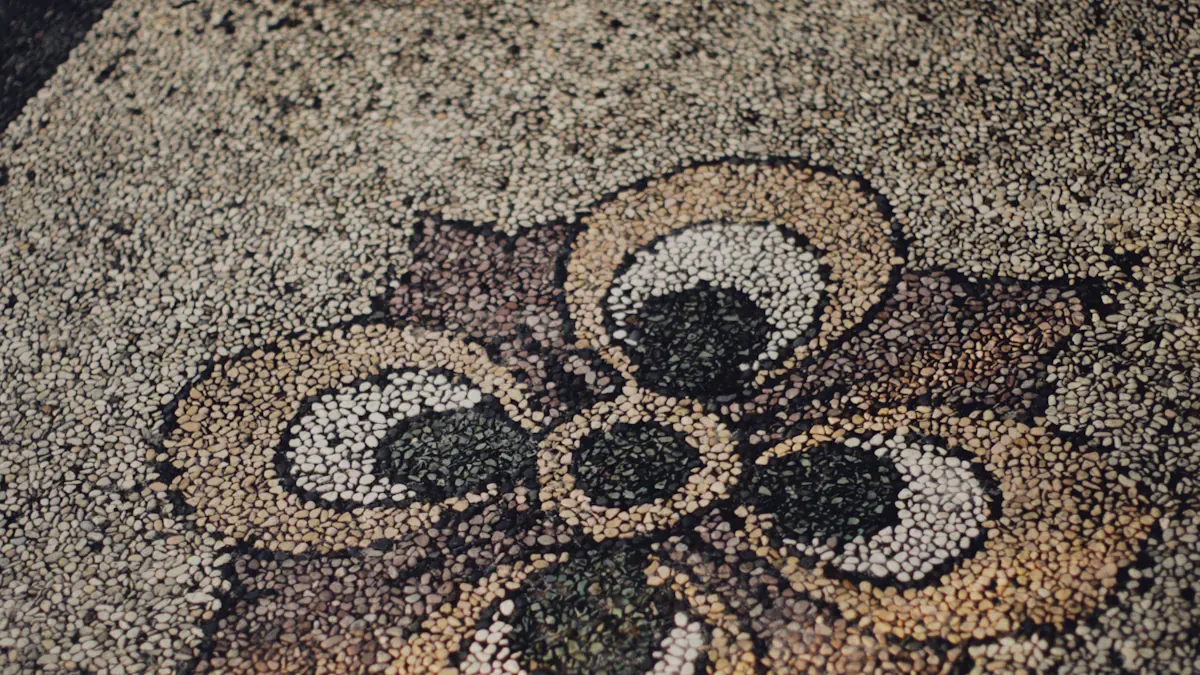
Matching materials is a very important step. You want your repair to look like the rest of the floor. Look closely at the original floor. Notice the colors, textures, and sizes of the materials. Take your time to study these details. This helps your repair look natural and last a long time.
Select Resin and Aggregate
Compare colors and sizes
First, check the terrazzo that is already there. Find out what resin binder and aggregate chips are used. Follow these steps to help you:
- Look at the aggregate chips and see their sizes. Standard terrazzo uses sizes from #0 to #2. Venetian terrazzo uses bigger chips, from #3 to #8.
- Check the color of the cement binder. It can be white, gray, or another color.
- Find faded spots and try to match those colors too.
- Ask suppliers to help you find chips that look like your floor.
Grinding shows what is hidden in the floor. Some chips were covered by epoxy and now you can see them.
When you compare colors and sizes, your patch will not stand out. This step helps your repair look professional.
Test sample mixes
Before you fix the whole area, mix small samples. Put these samples next to the original floor. See if the colors and textures match well. Professionals do this to make repairs hard to see. If the sample does not match, change your mix until it looks right.
Prepare Mix Design
Use two-part resin system
When you make your terrazzo patch mix, use a two-part resin system. This makes the patch strong and helps it stick well. Think about these things when you make your mix:
- Pick aggregates carefully. Do not use too many glass chips with dark colors. This can make the patch look cracked.
- Use fine aggregates like size #0 and #00 only a little.
- Do not mix hard chips like granite with soft ones like plastic.
- Choose colors that will last. Do not pick trendy colors.
- Check how the mix looks in different lights. Some chips change how they look.
Picking the right materials for terrazzo repairs is very important. When you match materials well, your repairs blend in and keep the floor looking nice. Paying attention to details helps your patch last longer and look better.
Use Primer or Bonding Agent
When you fix terrazzo, you want the patch to stick. Primer and bonding agents help with this. These products make your repair last longer and look better.
Apply Primer
Make the patch stick better
Primer gets the floor ready for terrazzo repair. You put primer on before the patch material. This step helps the patch stay on the floor. You do not want the patch to peel or crack. Primer makes the repair stronger and more dependable.
Always follow the instructions from the maker when using primer. Use a brush or roller to spread it out. Cover the whole spot where you will fix the floor. Let the primer dry before you move on.
Here are reasons why primer matters in terrazzo repair:
- Helps the patch stick to the floor
- Makes the repair last longer
- Makes cleaning easier after repair
- Helps the repair work well for a long time
Primer gives you a good base for repair. You avoid weak patches or early problems. Cleaning is easier after you finish the repair.
Tip: Always check how long primer needs to dry. If you hurry, the patch may not stick well.
When to Use Bonding Agent
For big or deep repairs
Bonding agents are needed for some repairs. You use them for big or deep spots. These agents help the terrazzo mix stick to the concrete. You want your repair to last and not crack.
Bonding agents give extra strength for repairs. They make a strong link between old floor and new patch. This keeps your repair from failing early.
Here is a table showing bonding agent features for terrazzo repair:
| Feature | Description |
|---|---|
| Type | 100% solid (VOC free) epoxy resin system |
| Purpose | Helps patch stick to concrete slab |
| Benefits | Makes repair last longer and stops cracks |
Use bonding agents when you want materials to work well together. Primers and bond coats are important for repairs. They stop early problems in the repair. If you skip or use bonding agents wrong, you can have big issues.
- Primers and bond coats help materials work together in repairs.
- They stop early problems in the repair.
- If you skip or use bonding agents wrong, you can have big issues.
Bonding agents make repairs stronger and last longer. Your floor looks nice and stays strong. You avoid cracks and weak spots.
Note: Always pick the right bonding agent for your repair. Ask your supplier if you are not sure.
Using primer and bonding agents builds a strong base for terrazzo repair. These steps help your repair blend in and stay strong. Your floor looks new and works well for years.
Mix Terrazzo Patch
Combine Resin and Aggregate
Achieve correct consistency
You need to mix the resin and aggregate carefully. Start by measuring the two-part resin system. Part A is the resin, and Part B is the curing agent. Follow the instructions on the package for the right ratio. Pour Part A into a clean bucket, then add Part B. Stir slowly with a mixing stick or a low-speed drill. Mix until the color looks even and smooth.
Add the aggregate chips to the resin. Choose chips that match the size and color of your floor. Pour the chips in a little at a time. Stir after each addition. You want the mix to look thick but not dry. If the mix feels too runny, add more chips. If it feels too stiff, add a small amount of resin. The right consistency helps the patch blend with the rest of the floor.
Tip: Always mix small batches. This gives you better control and keeps the resin from hardening too fast.
Avoid air bubbles
Air bubbles can make the repair look rough. To avoid bubbles, stir the mix slowly. Do not whip or shake the bucket. Tap the bucket gently on the ground to help bubbles rise to the top. Let the mix sit for a few minutes before you use it. If you see bubbles on the surface, pop them with a toothpick or a small tool.
A smooth mix gives you a better finish. You want the terrazzo to look even and professional.
Color Matching
Adjust mix for best match
Color matching is one of the most important steps in terrazzo repair. You want the new mix to look just like the old floor. Start by cutting out a small section of the damaged area. This helps you see the real colors and chips inside the floor. Look closely at the resin color and the types of aggregate chips.
Follow these steps for the best color matching results:
- Study the existing floor under good light. Notice any faded spots or color changes.
- Test small sample mixes. Place them next to the floor and check the color when dry.
- Adjust the amount of pigment or chips in your mix. Add more or less until you get a close match.
- Pour the mix into the patch area using a trowel. Spread it evenly and make sure the chips sit flat.
- Let the patch cure for up to 24 hours. Watch for any color changes as it dries.
Note: Colors can look different when wet and dry. Always check the final color after the mix has cured.
A good color matching process makes your repair almost invisible. Take your time and adjust the mix as needed. This step helps your terrazzo floor look new and keeps the repair strong.
| Step | What to Do |
|---|---|
| Mix resin and chips | Use correct ratio and stir slowly |
| Test samples | Compare with floor and adjust as needed |
| Apply and cure | Spread evenly and let dry for 24 hours |
Apply Patch Material
When you reach this step, you start to see your terrazzo floor come back to life. You need to fill the damaged area with the patch mix you prepared. You want to make sure the patch is strong and blends with the rest of the floor.
Fill and Compact
Layer for depth
You should not fill deep holes all at once. If the damaged area is deep, add the patch mix in thin layers. Each layer should be about a quarter inch thick. Let each layer set for a few minutes before adding the next. This helps the patch stay strong and prevents cracks. For patching small damaged areas, one layer is usually enough. You want to build up the patch until it is level with the floor.
Tip: Use a small trowel or putty knife to spread each layer. Work slowly and cover the whole area.
Compact mixture
After you add each layer, press down gently with your trowel. This step removes air pockets and makes the patch solid. You can tap the surface with the flat side of the trowel. Make sure the mix fills every corner of the hole. If you see any gaps, add a little more mix and press again. Compacting the mixture helps the patch last longer and look better.
Shape and Smooth
Blend with floor surface
Now you need to shape the patch so it matches the rest of the floor. Use your trowel to smooth the surface. Try to make the patch as flat as the surrounding terrazzo. Work from the edges toward the center. Feather the edges so there is no sharp line between the old floor and the new patch.
You can use special products to help shape and smooth the patch. Here is a table with some options:
| Product Name | Description | Key Features |
|---|---|---|
| ARDEX K 55 RAPID | A self-drying, self-leveling underlayment for terrazzo. | High-flow, featheredges, dries fast, ready in 2 hrs. |
| ARDEX K 60 ARDITEX | A trowelable latex leveling compound for smoothing. | Great adhesion, no profiling, self-levels. |
| ARDEX K 15® | A self-leveling underlayment for many surfaces. | Fast leveling, pourable, makes a smooth surface. |
These products help you get a smooth finish. They make it easier to blend the patch with the rest of the floor. You can use them if you want a professional look.
Note: Always follow the instructions on the product label. This helps you get the best results.
Take your time with this step. A smooth patch will look better after you polish and seal the floor. You want the repair to disappear into the rest of the terrazzo.
Cure and Inspect
After you finish applying the terrazzo patch, you need to let it cure. This step is important for a strong and long-lasting repair. You should not rush this part. Good curing helps the patch blend with the rest of the floor.
Allow Proper Curing
Monitor temperature and humidity
You must watch the temperature and humidity in the room. Terrazzo repairs cure best at room temperature, usually between 65°F and 75°F. If the room is too cold, the patch will cure slowly. If it is too hot, the patch may dry too fast and crack. Humidity also matters. High humidity can cause the patch to stay soft. Low humidity can make it dry too quickly.
You can use a thermometer and a humidity gauge to check the room. Keep windows closed and fans off. This helps the patch cure evenly. If you work in a basement or a place with poor airflow, you may need a dehumidifier. Always follow the instructions on your terrazzo repair kit for the best results.
Tip: Do not walk on the patch while it cures. Wait at least 24 hours before touching or cleaning the area.
Check for Issues
Look for shrinkage or cracks
After the patch cures, you need to inspect it. Look for any problems like shrinkage, cracks, or color changes. Use a flashlight to check the surface. Run your hand over the patch to feel for bumps or dips. If you see a crack, it may mean the patch dried too fast or the mix was not right.
You should also check for other common issues that can happen during or after curing. Here is a table that shows what to look for and what it means:
| Issue Type | Description |
|---|---|
| Wax Buildup | Wax can build up and hide the terrazzo surface. You may need special cleaners to remove it. |
| Scratches and Dullness | Small scratches can make the floor look hazy. You can fix this with diamond grinding. |
| Cracks | Cracks can form from movement or poor design. Fill them with color-matched resin or sealant. |
| Chips and Spalls | Impact can cause chips. Use epoxy or cement to repair these spots. |
| Divider Strip Damage | Strips can get damaged. You may need to adjust or replace them. |
| Staining | Spills can stain terrazzo. Use a poultice or grinding to remove stains. |
If you find any of these problems, you can fix them before you finish the floor. Small cracks or chips can be filled with more patch mix. Stains or dull spots may need extra cleaning or polishing.
Note: Careful inspection now saves you time later. Fixing small problems early helps your terrazzo floor stay beautiful and strong.
Take your time with curing and inspection. These steps help your repair last longer and look better. You want your terrazzo floor to shine and stay strong for many years.
Finish, Polish, and Seal
A great terrazzo repair does not end with patching. You need to finish, polish, and seal the surface. These steps help your repair blend in and last longer. You want your floor to look smooth and shiny, just like new.
Grind and Polish
Use correct grit levels
Grinding and polishing remove rough spots and make the surface even. You start with a coarse grit to level the patch. Then, you move to finer grits to smooth and shine the floor. Each grit makes the surface smoother. You should not skip grit levels. This helps you avoid scratches and get a uniform look.
Here are some tools you can use for grinding and polishing terrazzo:
| Equipment Type | Features |
|---|---|
| Automated Tile Polishing System | Automates grinding and polishing, gives consistent results. |
| Compact Floor Grinders | Good for small projects, easy to move and control. |
| Diamond Devil® Polishing System | Uses different tools for satin or polished finish, can give a high gloss. |
| Electric Floor-Grinding Machine | Essential for terrazzo, uses steel weights for better grinding. |
| Planetary Polishing Machine | Helps you get a uniform finish on all terrazzo surfaces. |
You can also use a wet polisher, angle grinder with diamond pad, or a planetary polishing machine for smaller repairs.
Tip: Always wear safety glasses and a mask when grinding terrazzo.
Achieve uniform finish
You want the repaired area to match the rest of the floor. Work slowly and check your progress often. Use a polishing pad to bring out the shine. If you see dull spots, go back to a finer grit. Wipe away dust between each step. When you finish, the patch should look just like the original floor.
Seal and Protect
Choose right sealant
Sealing protects your terrazzo from stains and wear. You need to pick the right sealant for your space. Here is a table to help you choose:
| Sealant Type | Properties | Best Use Case |
|---|---|---|
| Single-component | Easy to use, good for low-traffic areas | Homes, light use |
| Two-component | Strong, resists acids and heavy traffic | Schools, stores, busy areas |
| Water-based | Low odor, eco-friendly | Homes, green projects |
| Oil-based | Deep protection, very durable | Garages, high-wear spots |
| Acrylic | Shiny look, may be slippery | Entryways, showrooms |
| Epoxy | Very tough, may yellow in sunlight | Factories, busy halls |
| Polyurethane | Flexible, strong, but strong smell | Sunrooms, outdoor spaces |
| Penetrating | Invisible, keeps natural look | Living rooms, bedrooms |
Follow these steps to seal your terrazzo:
- Sweep or vacuum to remove dust.
- Clean with a terrazzo cleaner.
- Rinse with clean water.
- Let the floor dry completely.
- Apply the sealer with a roller or mop.
- Let it dry, then add a second or third coat if needed.
Note: Always follow the instructions on your sealer for best results.
Maintenance tips
Regular care keeps your terrazzo looking new. Here are some easy tips:
- Dust mop every day to remove dirt.
- Damp mop once a week with a neutral cleaner.
- Avoid harsh chemicals that can damage the floor.
- Strip and reseal the floor every six months.
- Use only neutral pH cleaners.
- Wipe up spills right away to prevent stains.
Keeping up with these steps helps your terrazzo repair last for many years. A little care goes a long way!
If you follow each step carefully, your terrazzo floor will look great. The table below shows how each part helps your floor:
| Step | Description |
|---|---|
| 1 | Grinding makes the surface ready. |
| 2 | Polishing gives the floor a shiny look. |
| 3 | Fixing and blending patches makes it smooth. |
Take your time and pay attention to details. Using the right materials and finishing the floor well are very important for terrazzo restoration. Cleaning and caring for your floor often keeps it shiny, strong, and nice for a long time.
FAQ
How long does terrazzo repair take?
Most small repairs take one to two days. You need time for cleaning, patching, curing, and sealing. Larger repairs may take longer. Always let the patch cure fully before using the floor.
Can you repair terrazzo yourself?
Yes, you can repair terrazzo yourself if you follow the steps carefully. Use the right materials and tools. Take your time. For large or deep damage, you may want to call a professional.
What tools do you need for terrazzo repair?
You need a trowel, mixing bucket, vacuum, grinder, and polishing pads. Safety gear like gloves and a mask help protect you. Some repairs need special tools for grinding and sealing.
How do you match terrazzo colors?
You match terrazzo colors by testing small sample mixes. Compare them to your floor in good light. Adjust the resin and chips until you get a close match. Always check the color after the patch dries.
Why does my terrazzo patch look dull?
A dull patch often means you need more polishing. Use finer grit pads to bring out the shine. Clean the area well before sealing. If it still looks dull, try polishing again.
How do you prevent cracks in terrazzo repairs?
You prevent cracks by cleaning the area, using primer or bonding agent, and adding patch mix in thin layers. Let each layer set before adding more. Avoid rushing the curing process.
How often should you seal terrazzo floors?
You should seal terrazzo floors every six to twelve months. High-traffic areas may need sealing more often. Regular sealing protects against stains and keeps the floor shiny.
What should you avoid when cleaning terrazzo?
Avoid harsh chemicals, vinegar, or bleach. These can damage the floor. Use a neutral pH cleaner and a soft mop. Wipe up spills quickly to prevent stains.