
To achieve a perfect terrazzo floor installation, you need to be careful and attentive to each step. Every part of the terrazzo floor installation process is crucial as it affects both the appearance and durability of your floor. Many people choose terrazzo floors because they enhance the aesthetic appeal of any space. They are not only strong but also easy to clean. Surveys indicate that these floors can last over 100 years with minimal maintenance. Before you begin your terrazzo floor installation, gather your tools and materials to stay organized and safe. You don’t have to be an expert; with patience and focus, you can create a beautiful terrazzo floor.
| Benefit | Description |
|---|---|
| Aesthetic Appeal | Terrazzo looks nice and makes any space better. |
| Durability | It stays strong for many years, even in busy places. |
| Low Maintenance | You spend less time and money keeping it clean. |
Key Takeaways
- Terrazzo floors are strong and can last a long time. They can stay good for over 100 years if you take care of them.
- Get all the tools and materials you need before you start. This helps your installation go smoothly.
- Clean and level the subfloor before you begin. This stops problems from happening later.
- Use divider strips to stop cracks and make nice designs. Divider strips help your terrazzo floor look better.
- Mix the right amount of aggregate and binder together. This makes your floor strong and look good.
- Grind, polish, and seal your floor to make it shine. These steps also protect your floor from harm.
- Clean your terrazzo floor often to keep it looking nice. Take care of it so it stays great for many years.
- Do not use harsh chemicals when you clean the floor. This keeps the surface safe from damage.
Terrazzo Floor Installation Overview
What Is Terrazzo
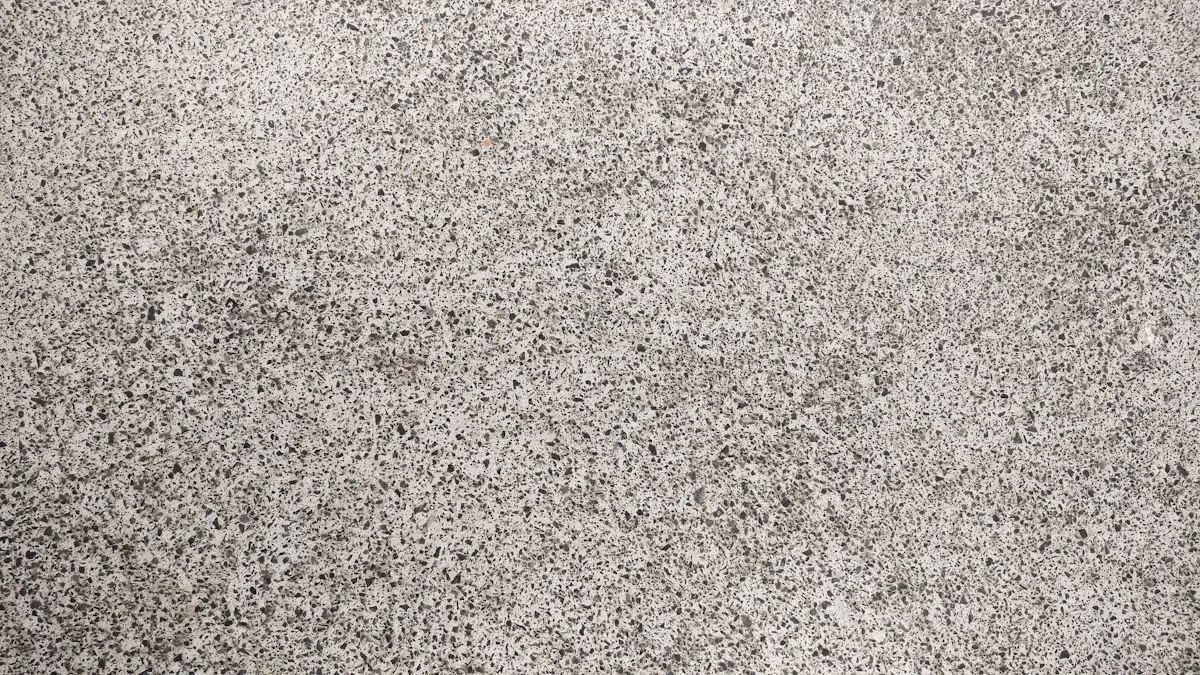
You may ask why terrazzo floors are unique. Terrazzo is a floor made by mixing marble, glass, or granite chips with a binder like cement or epoxy. This mix makes a smooth and colorful floor that looks nice in any room. People have used terrazzo for hundreds of years because it is pretty and lasts long. Terrazzo floors do not crack or chip easily. The marble and glass chips make the floor strong and safe. Epoxy terrazzo does not have harmful chemicals, so it keeps the air inside clean.
Benefits of Terrazzo Floors
Terrazzo floors have many good points. They can last up to 100 years if you take care of them. This is much longer than carpet or vinyl, which only last 5 to 20 years. The table below shows how long each floor type lasts:
| Flooring Material | Expected Lifespan | Cost-Effectiveness |
|---|---|---|
| Terrazzo | 75-100 years | High |
| Carpet | 5-15 years | Low |
| Vinyl | 10-20 years | Medium |
Terrazzo floors are also good for the planet. Many use recycled materials, so they help cut down on waste. Epoxy terrazzo does not let out bad chemicals, so it makes the air better inside. The floor does not let water in, so you do not need to worry about mold or germs. Its surface is not slippery, so it keeps you safe even in busy places.
Here are some reasons why terrazzo floors are a good pick:
- They use recycled glass, marble, or granite chips.
- They have no VOC emissions, so they are safe for your house.
- They help buildings get LEED certification for being green.
- They are simple to clean and keep up.
How Terrazzo Floors Are Installed
There are a few steps to install terrazzo floors the right way. Each step helps make the floor smooth and strong. First, you test the floor for moisture. Then, you get the concrete ready by grinding or blasting it and fixing cracks. Next, you plan the design and put in divider strips to split colors or sections. After that, you mix the binder and chips, pour the mix, and spread it out. When the floor dries, you grind it to show the chips and fill small holes. The last steps are to polish and seal the floor to keep it safe.
| Step | Description |
|---|---|
| Moisture Testing | Check the floor for water; keep humidity under 80%. |
| Concrete Preparation | Grind or blast the surface; fix cracks and make it level. |
| Floor Layout | Plan the look and put in divider strips. |
| Mixing Components | Mix epoxy resin, hardener, filler, and chips. |
| Pour in Place | Pour the mix on the floor and spread it out. |
| Troweling | Use trowels to make the floor flat and smooth. |
| Grinding | Grind the floor to show the chips and make it smooth. |
| Grouting | Fill small holes with matching material after grinding. |
If you follow these steps, you will get a terrazzo floor that looks nice and lasts a long time. Knowing how terrazzo floors are put in helps you plan and avoid mistakes.
Tools & Materials
Before you begin, gather all your tools and materials. You also need safety gear. Having everything ready helps you work faster. It also keeps your terrazzo floor installation safe and easy. Always check your list before you start to get the floor ready.
Essential Tools
You need many tools to put in terrazzo floors. These tools help you mix, pour, and finish the floor. They make the floor look flat and strong. Here are the most important tools:
- Shot blaster cleans and roughens the floor.
- Moisture meter checks for water in the subfloor.
- Divider strips make patterns and sections.
- Shovels and wheelbarrows move materials.
- Trowel spreads the mixture evenly.
- Grinding machine smooths the surface.
- Polishing machine makes the floor shiny.
- Sealer applicator protects the floor.
Tip: Pick good tools from brands like Mapei. This helps your tools last longer and work better.
Materials Needed
You need the right materials to make your terrazzo floor last. The table below shows what you need and how each item helps.
| Material/Tool | Purpose/Use |
|---|---|
| High quality medium-bed thin set | Sets tiles on a flat and dry subfloor. |
| Uncoupling membrane (e.g., DITRA) | Stops cracks from sub-surface movement. |
| Sponge, Bucket | Used for mixing and applying materials. |
| 1/8” tile spacers | Keeps space even between tiles. |
| Trowel | Spreads thin set mortar. |
| Mapei Flexcolor CQ | Grout fills spaces between tiles, best in neutral color. |
| Grout float, Grout bag | Used for putting in and moving grout. |
| Water-cooled tile saw with diamond blade | Cuts tiles to fit as needed. |
| pH neutral cleaner | Cleans tiles after you finish. |
| 511 Porous Plus Sealer | Seals tiles inside and outside. |
| Fila Matte Finish Protective Wax | Adds a protective finish on sealed tiles. |
Note: When using epoxy terrazzo, pick the right binder and chips. This gives you the best look and strength.
Safety Gear
Safety is very important when you put in a terrazzo floor. Always wear the right gear to keep safe from dust and sharp tools. The table below shows the basic safety gear you need:
| Mandatory Safety Gear |
|---|
| Safety Glasses |
| Hard Hats |
You can also wear gloves, ear protection, and a dust mask. This gives you extra safety. Always check your gear before you start.
When you use the right tools, materials, and safety gear, your terrazzo floor will be strong and smooth. Careful planning helps you avoid mistakes and finish your project well.
Preparing the Subfloor
A perfect terrazzo floor installation needs a strong base. You must get the subfloor ready with care. This helps your terrazzo floor installation last many years and look great.
Cleaning & Leveling
Check the subfloor before you start. Look for cracks, wet spots, loose parts, or trash. Cleaning and leveling the subfloor is very important for a smooth floor. Here are the steps you should follow:
- Sweep and vacuum to get rid of dust and dirt.
- Take off old glue, paint, or other coatings.
- Fill cracks or holes with patching compound.
- Use good materials that fit your space.
- Put on a primer so the leveling compound sticks.
- Make the floor flat with self-leveling compound if you need to.
Tip: Check the floor often during and after you work. This helps you find problems early.
If you want your terrazzo floor installation to stay strong, do not skip these steps. Clean and level the subfloor carefully.
Moisture Testing
Water can hurt terrazzo floors over time. You need to test for moisture before you put in epoxy terrazzo. Different subfloors need different tools for testing. The table below shows ways to test for moisture:
| Technique | Description |
|---|---|
| Floor Moisture Meters | Measure how much water and humidity is in the floor. |
| Tramex Concrete Moisture Meters | Test concrete to see if it is dry enough for terrazzo floor installation. |
| Pin Probe Mode | Check for water in wood subfloors like OSB or plywood. |
| Dual-Depth Pinless Meter | Test for water at different depths without making holes. |
| Shallow Depth Feature | Find water just under the floor covering to spot hidden problems. |
Always follow what the manufacturer says about moisture levels. If you find too much water, fix it before you keep going.
Repairing Imperfections
Small cracks and holes can cause big trouble for terrazzo floors. Fix all problems before you pour the terrazzo mix. Here is what you should do:
- Fill cracks and holes with patching material that matches.
- Smooth patched spots with a trowel.
- Let repairs dry all the way before you move on.
- Check the floor for any spots you missed.
Note: If you see big cracks or damage, ask a pro for help.
Taking time to fix problems will help your terrazzo floor installation look nice and last longer. Careful prep gives you the best results for your terrazzo floor installation.
Divider Strips & Layout
Divider strips are very important in terrazzo floor installation. They help stop cracks and let you make the design you want. Divider strips also keep colors and sections apart. This makes your terrazzo floor strong and nice to look at.
Placing Divider Strips
Pick divider strips that fit your project. You can use aluminum, zinc, brass, or plastic. Each one looks different and lasts a different amount of time. Put divider strips where there are joints under the concrete. For cement terrazzo, put strips every 3 to 5 feet. For epoxy terrazzo, you can go 20 to 30 feet between strips. This is because cement and epoxy terrazzo move and change with heat in different ways.
| Key Points | Description |
|---|---|
| Function of Divider Strips | Control cracking and form the design of the floor. |
| Material Options | Aluminum, zinc, brass, and plastic divider strips. |
| Installation Considerations | Cement terrazzo spans 3-5 feet; epoxy terrazzo spans 20-30 feet. Place strips at joints. |
Pour the terrazzo mix on the subfloor. Spread it out between the divider strips. Use a hand trowel to press the mix down. This gets rid of air bubbles. Try to keep the mix about 3/8 inch thick. This helps your terrazzo floor stay flat and strong.
Tip: Always check where you put divider strips before pouring. It is hard to fix mistakes later.
Design Planning
Planning your design helps your terrazzo floors look special. Think about how it will look and work. Divider strips do more than split colors. They also help stop cracks. Designers move strips to make the floor pretty and strong. For cement terrazzo, put expansion joints every 4 feet by 4 feet. This stops cracks from starting. Epoxy terrazzo changes size more with heat, so plan for that in your layout.
| Key Consideration | Description |
|---|---|
| Strip Placement | Adjust strip placement to prevent cracking from movement. |
| Expansion Joints | Use every 4’x4′ for cement terrazzo to counter cracking. |
| Temperature Effects | Epoxy terrazzo expands and contracts more with temperature changes. |
| Collaboration | Work with designers, suppliers, and contractors for the best results. |
You can make easy or hard patterns. Waterjet cutting lets you make detailed shapes. Hand-cutting works for simple designs. Plan with your contractor and designer to get the look you want.
Measuring & Marking
Measuring and marking right is very important for a good terrazzo floor. First, measure the room and mark where each divider strip goes. Use chalk lines or markers to make straight lines. Check your measurements before you put in the strips. This makes sure your design matches your plan and stops mistakes.
- Measure the whole space carefully.
- Mark where divider strips go with chalk or a marker.
- Make sure everything lines up and is spaced right.
- Check all your marks before you put in strips.
Note: Take your time measuring and marking. This will help you avoid mistakes and save money.
If you follow these steps, your terrazzo floor will look great and last a long time.
Mixing & Pouring Terrazzo
Mixing and pouring terrazzo is the heart of terrazzo floor installation. You must pay close attention to every step. Proper mixing and pouring give you a smooth, strong, and beautiful terrazzo floor. If you rush or skip steps, you may see cracks, uneven surfaces, or color problems. You can avoid these issues by following each step carefully.
Mixing Components
You need to mix the right materials to get the best results. The main parts are the aggregate and the binder. The aggregate includes marble, glass, or granite chips. The binder holds everything together. You can use cement or epoxy terrazzo as the binder.
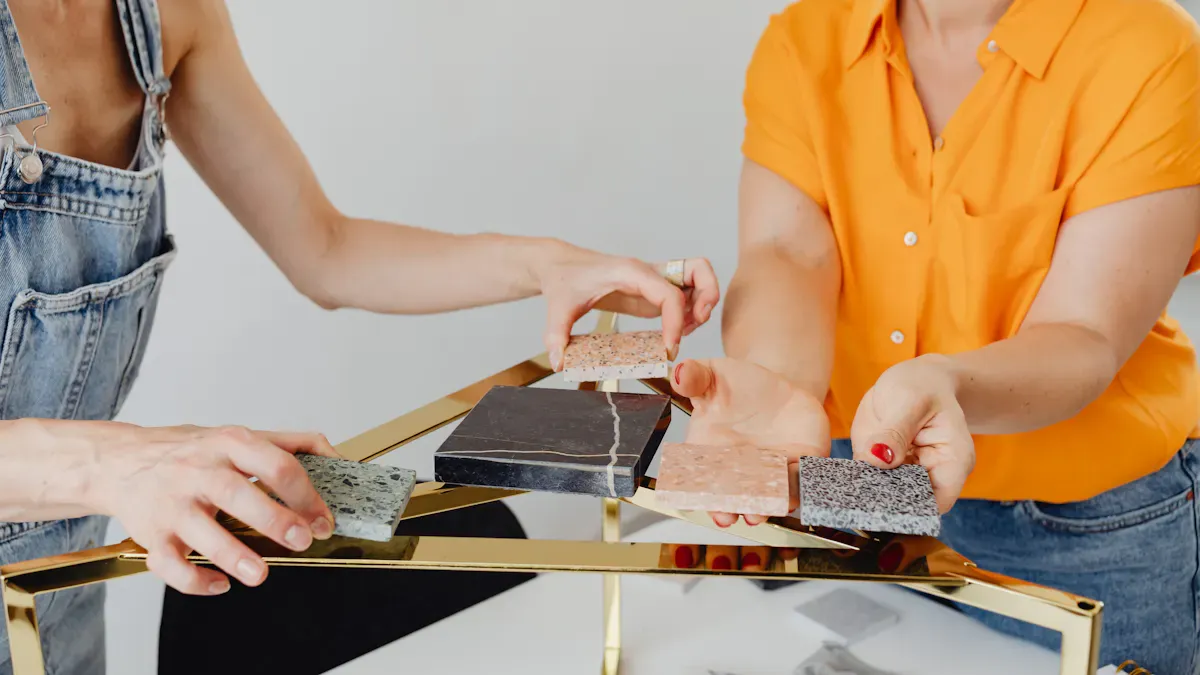
Aggregate Selection
Choose the aggregate based on the look and strength you want. Marble chips give a classic look. Glass chips add color and shine. Granite chips make the floor tough. You must also pick the right size and color for your design.
The ratio of aggregate to binder affects the strength and appearance of terrazzo floors. Here are some common ratios:
- A 6:4 ratio works well for high flexural strength.
- A 7:3 ratio fits most building sites.
- An 8:2 ratio gives excellent compressive strength, flexural strength, and wear resistance.
You can talk to your supplier, such as Mapei, to help you choose the best mix for your project.
Binder Preparation
Pick the binder that matches your needs. Cement binders work for traditional terrazzo floors. Epoxy terrazzo binders give you more color choices and a thinner floor. You must mix the binder according to the instructions. Use clean tools and measure each part carefully. If you use epoxy terrazzo, mix the resin and hardener until you see a smooth, even color.
Tip: Always mix small batches. This helps you control the quality and prevents waste.
Pouring Mixture
You must pour the terrazzo mixture quickly after mixing. Start at one corner and move across the room. Pour the terrazzo between the divider strips. Use a shovel or bucket to place the mixture. Make sure you fill every section evenly.
If you pour the terrazzo too slowly, the mixture may start to set. This can cause uneven surfaces and color changes. Work with a team to keep the process smooth.
Troweling Evenly
After you pour the terrazzo, you need to trowel the surface. Use a steel trowel to spread the mixture. Press down to remove air bubbles and make the floor flat. Keep the thickness at about 3/8 inch. Move the trowel in different directions to get an even finish.
Follow these steps for troweling:
- Start at the edge and work toward the center.
- Press the mixture firmly to fill gaps.
- Smooth the surface with long strokes.
- Check for low spots and add more mixture if needed.
- Let the floor set before moving to the next step.
Note: If you see patches or color differences, you may need to fix them before the mixture sets.
You can avoid common mistakes by paying attention to details. Here are some problems you may face and how to prevent them:
- Improper patchwork and color matching can cause visible inconsistencies. Match aggregate size and type. Blend pigments well. Grind patches flush with the floor.
- Chemical damage and etching can ruin the surface. Do not use acids or harsh cleaners.
- Lack of densification and protection can lead to faster wear. Densify cement terrazzo to make it last longer.
If you follow these steps, you will create a terrazzo floor that looks great and lasts for years. You can enjoy the beauty and strength of your new floor. When you install epoxy terrazzo, you get more color options and a smoother finish. Always pour the terrazzo carefully and trowel evenly for the best results.
Grinding, Polishing & Sealing
After you pour and trowel the terrazzo, you need to grind the floor. This step makes the surface flat and brings out the beauty of the chips. Grinding, polishing, and sealing are the final steps in terrazzo floor installation. These steps help your floor shine and last for many years.
Grinding Surface
Grinding removes rough spots and reveals the smooth terrazzo underneath. You should follow industry standards to get the best results. The National Terrazzo and Mosaic Association (NTMA) gives clear steps for this process.
Initial Grinding
Start with a coarse grit, such as #24, to level the surface. Use a heavy grinding machine. Move the machine slowly and cover the whole floor. This step takes off high spots and exposes the chips. You may need to use different grinding stones based on the hardness of your aggregates. Resin or metal bonds work well for most terrazzo floors. Many people now choose eco-friendly grinding solutions, which help protect the environment.
Fine Grinding
Switch to a finer grit, like #80, for the next pass. This step smooths out scratches from the first grind. You want a clean, even finish. Wash the floor with water to remove dust. Let the surface dry before you move on. The table below shows the standard steps for grinding terrazzo:
| Step | Description |
|---|---|
| 1 | Resurface terrazzo according to NTMA specifications. |
| 2 | Grind and polish for a clean, smooth, and uniform finish. |
| 3 | Use #24 or finer grit for initial grinding, then #80 or finer. |
| 4 | Wash and seal the surface with a penetrating type sealer. |
Polishing Terrazzo
Polishing gives your terrazzo floor a glossy look. You can use a system like the Diamond Devil® Terrazzo Restoration and Polishing System. Make six passes with each tool, starting with the hone and then the polish. Use the +1 Red Shine Tool for extra gloss. Always clean the floor with a damp mop and a mild pH-neutral cleaner before you polish. Make sure the floor is dry. Buff the floor with a soft pad. Use polishing powder and buff until the powder is gone. Clean the floor again to remove any residue. If you see scratches or voids, smooth them out with a grinder. Polish the floor with 800, 1500, and 2000 grit powders, cleaning between each step. Apply a final sealer for protection.
To keep your terrazzo floors safe, let professionals handle the polishing. They use special tools and products made for terrazzo.
Sealing Floor
Sealing protects your terrazzo floor from stains and moisture. You can choose from many types of sealers. The table below shows the most common options:
| Sealer Type | Characteristics | Benefits |
|---|---|---|
| Single-component | Easy to apply, store leftovers | Good for DIY, fits many terrazzo types |
| Two-component | Needs mixing, very durable | Best for busy areas, resists acids |
| Water-based | Low odor, eco-friendly | Safe for air, easy cleanup |
| Oil-based | Deep penetration, long-lasting | Great for tough spaces |
| Acrylic | Versatile, many options | Looks nice, good for low-traffic areas |
| Epoxy | Strong, needs careful use | Best for high-traffic, very durable |
| Polyurethane | Flexible, resists sun | Good for looks and strength |
| Penetrating | Seals pores, keeps natural look | Best for homes, needs care with stains |
You can ask your supplier, like Mapei, for advice on the best sealer for your project. Always follow the instructions on the product. Let the sealer dry before you walk on the floor.
If you follow these steps, your epoxy terrazzo will shine and stay strong for years. Grinding, polishing, and sealing make your terrazzo floor installation a success.
Cleaning & Maintenance
Cleaning After Installation
You need to clean your terrazzo floor right after installation to keep it looking its best. Start by dust mopping the entire surface. This removes loose dirt that can cause scratches. Pay special attention to entryways and hallways, as these areas collect more dirt. If you see any spills, blot them right away with a clean cloth. This prevents stains from setting in.
For weekly cleaning, mix a pH-neutral solution. Use a damp mop to clean the floor in sections. Rinse each section with clean water and dry it with microfiber towels. This method keeps your floor shiny and free from streaks. Avoid using harsh or abrasive cleaners, as they can damage the surface.
Maintenance Tips
A good maintenance routine helps your terrazzo floor last for many years. You should follow these steps:
- Clean daily to remove dirt and debris.
- Once a week, use an auto-scrubber with a pH-neutral solution. Burnish high-traffic areas if needed.
- Every month, inspect the floor and scrub hard-to-reach spots by hand. Check if the sealer looks worn.
- Every three months, deep clean with a terrazzo cleaner and polish the floor with a machine.
- Once a year, assess the floor’s gloss and surface. Restore it if you see dull spots or damage.
If you have epoxy terrazzo, these steps will help keep the color bright and the surface smooth. Always apply a sealant after polishing to protect the floor from stains and moisture. You can ask Mapei for advice on the best products for your floor.
Tip: Place mats at entrances to catch dirt before it reaches your terrazzo floor.
Common Mistakes
Many people make mistakes when caring for terrazzo floors. You can avoid these problems by following a few simple rules:
- Do not use harsh chemicals or abrasive cleaners. These can dull or scratch the surface.
- Always use a pH-neutral, non-abrasive cleaner or mild dish soap diluted in water.
- Sweep or vacuum often to prevent dirt from building up.
- Use a damp microfiber mop for regular cleaning.
- Never use acidic cleaners, as they can damage the floor.
In one case, a homeowner used household bleach on terrazzo. This caused permanent white spots and damaged the marble chips. Repeated use of harsh chemicals like bleach can lead to costly repairs.
By following these tips, you will keep your terrazzo floor installation looking beautiful and strong for many years.
You can get a perfect terrazzo floor if you follow each step. Be careful and take your time with every part. Each stage helps your floor last longer and look better. Grinding makes the surface smooth and strong. Grouting keeps the floor clean and easy to care for. Polishing gives the floor a shiny look and stops slips. Sealing protects the floor from stains and damage.
| Step | Benefit |
|---|---|
| Grinding | Smooth, durable, and attractive surface |
| Grouting | Hygienic and easy to maintain |
| Polishing | Glossy look and slip resistance |
| Sealing | Protection from stains and wear |
To keep your terrazzo floor nice, clean it every day. Use a pH-neutral cleaner and put on sealer again when needed. Do not use strong chemicals. Ask experts like Mapei for help with hard jobs.
FAQ
How long does it take to install a terrazzo floor?
You can expect the process to take about one to two weeks for most homes. Larger spaces or complex designs may need more time. Drying and curing add extra days.
Can I install terrazzo floors myself?
You can try if you have experience with flooring projects. For best results, you should ask a professional or contact Mapei for advice and support.
What is the best way to clean a terrazzo floor?
Use a soft mop and a pH-neutral cleaner. Avoid harsh chemicals. Clean spills right away to prevent stains. Place mats at doors to keep dirt away.
Will terrazzo floors crack over time?
If you prepare the subfloor well and use divider strips, cracks are rare. Proper installation helps your floor last for decades without major problems.
Are terrazzo floors slippery when wet?
Terrazzo floors can be slippery if wet. You can reduce slips by using a non-slip sealer or mats in busy areas. Always wipe up spills quickly.
How do I choose the right aggregate color?
You should look at samples and talk with your installer. Mapei offers many colors and styles. Pick one that matches your space and design.
Do terrazzo floors need sealing?
Yes, you should seal your floor after installation. Sealing protects against stains and moisture. Reapply sealer as needed to keep your floor looking new.